101707 Vacuum Breaker
Preparation:
- The water supply shut off valves must be turned off- see article How to Turn Off the Water Supply to the Faucet.
- Recommended Tools: Flathead Screwdriver, Phillips screwdriver, Needle Nose Pliers, Bucket, Adjustable Wrench or Channel Locks
- The following instructions assume the handle and associated handle pieces have been removed. For additional details, visit Top Handle with Pullout Sprayer Faucets and select the type you are repairing. The faucet guide will contain specific information on handle assemblies associated with that style of product.
Vacuum Breaker Removal |
|
Image with Handle Removed
|
Image with Handle Removed
|
Image with Spout Receptor (D) Removed
|
||||||||||||||||||
.png?revision=1)
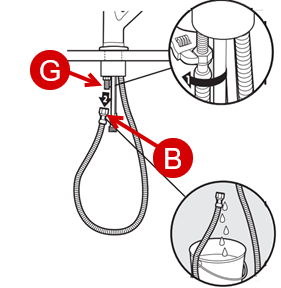
Step 1-Inspect your Hose ConnectionFrom under the sink, follow the hose (B) up to where the connection meets the discharge tube (G), if your hose attaches into a plastic quick connect, Contact Us. |
|
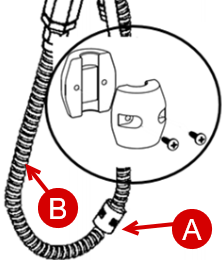
Step 2-Remove the Hose WeightIf the weight/faucet was installed prior to 2001: The two sections of the hose weight (A) are held together on the hose (B) with two Phillips screws. If the weight/faucet was installed after 2001: The two sections of the hose weight (A) are snapped together onto the hose (B). May require a flathead screwdriver for removal. |
|
Step 3-Detach the HoseUsing adjustable wrench or channel locks and a bucket,disconnect the hose (B) from the threaded discharge tube (G). When you shut a faucet off water remains at the bottom of the hose (B). As you disconnect the hose (B) from the threaded discharge tube (G), place the hose connection (B) into a bucket to drain the water.
|
 |
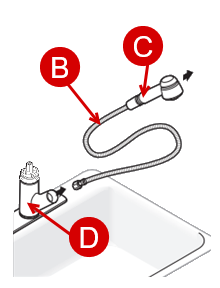
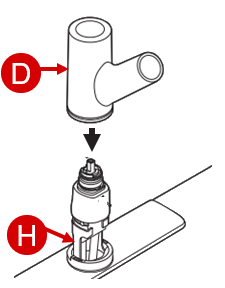
Step 4-Remove the Sprayer, Hose and ReceptorRotate the receptor (D) so it is facing forward and gently pull the sprayer (C) and hose (B) out of the receptor (D), see Image 1. If you encounter any resistance, stop and make sure there is nothing under the sink preventing the hose (B) from pulling out. If there is nothing interfering, reposition the receptor (D) slightly to to the left or right and try again. Once it is removed, lift the receptor (D) off of the valve body (H), see Image 2. |
Image 1
|
Image 2
|
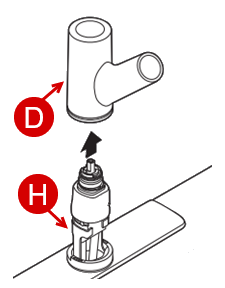
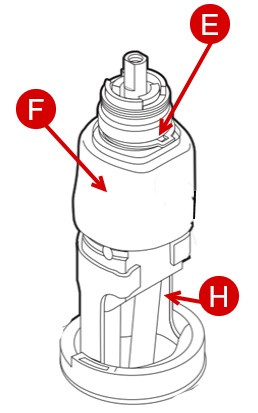
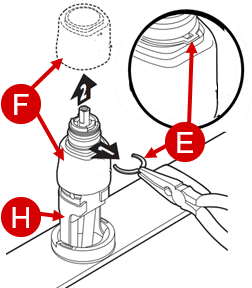
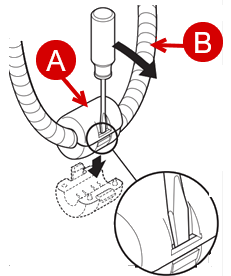
Step 5-Remove the C-Shaped Retainer Clip and Vacuum BreakerBegin by using needle nose pliers to carefully remove the metal c-shaped retainer clip (E) located above the vacuum breaker (F). Be careful not to bend or damage this part as it will be reused. Lift the vacuum breaker (F) off of the valve body (H). |
 |
Vacuum Breaker Replacement |
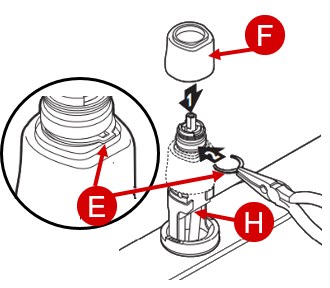
Step 1-Install the Vacuum Breaker and C-Shaped Retainer ClipPosition the flat side on the new vacuum breaker (F) so it lines up with the flat side on the valve body (H), generally located on the right side. Place the new vacuum breaker (F) on the valve body (H) pushing it down as far as it will go. This will expose the groove for the metal c-shaped retainer clip (E). Slide the metal c-shaped retainer clip (E) all the way into the groove directly above the vacuum breaker (F) on the valve body (H). |
 |
Step 2-Reinstall the Receptor, Hose and SprayerPlace the receptor (D) back onto the valve body (H) facing forward and push it down as far as it will go against the base, see Image 1. Carefully slide the hose connection (B) back through the opening in the receptor (D), see Image 2. If you encounter any resistance, you may need to reposition the receptor (D) slightly to the left or right and try again. |
Image 1
|
Image 2
|

Step 3-Reinstall the HoseFrom under the sink, pull the hose connection (B) the rest of the way through and reattach the hose (B) back onto the threaded discharge tube (G) .
|
|

Step 4-Reinstall the Hose Weight (A)If the weight/faucet was installed prior to 2001: The two sections of the hose weight (A) are held together on the hose (B) with two Phillips screws. If the weight/faucet was installed after 2001: The two sections of the hose weight (A) are snapped together onto the hose (B). May require a flathead screwdriver for removal.
|
  |
Step 5-Reassemble the HandleThe next step is to reassemble the handle pieces, if you need additional information, review Top Handle with Pullout Sprayer Faucets. Once the handle has been reassembled, turn the water supply shut off valves back on. |
|
For a comprehensive faucet guide, visit solutions.moen.com and select the type of faucet you are repairing. The faucet guide will contain specific information associated with that style of product.
Still Not Finding What You're Looking For?
Contact Us or Call 1-800-BUY-MOEN
Non US? Moen Canada | Other International Sites