1224 Cartridge: Two Handle 8" Wide Spread Valves (Prior to 2000)
Preparation:
- The water supply shut off valves must be turned off- see article How to Turn Off the Water Supply to the Faucet
- Recommended Tools: Needle-Nose Pliers and/or Removal Tool 14272
- The following instructions assume the handle and associated handle pieces have been removed. For additional details, visit solutions.moen.com and select the type you are repairing. The faucet guide will contain specific information on handle assemblies associated with that style of product.
|
|
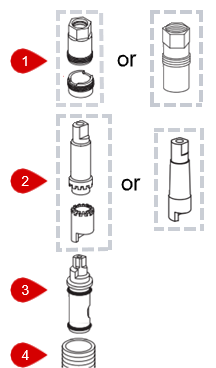
Disassembly: Step 1. Unthread the white hex cartridge nut (#1). Step 2. Lift the stem extension (#2) out of the valve body (#4). Compare to images below .
Step 3. Compare the white hex nut you removed in Step 1 to the images below.
Step 4. Using pliers, grab the white stem of the cartridge (#3) and pull the cartridge (#3) out. |


|
It is recommended to clean and flush the valve body (#4) prior to installing the new cartridge (#3). See Valve Body Cleaning and Flushing for additional details. Assembly: Step 1. Rotate the stem of the cartridge (#3) to the correct position for the side you are working on, see picture below for the orientation. 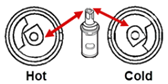
Step 2. Align the tab on the side of the cartridge (#2) with the notch down inside the wall of the brass valve body (#4) and slide the cartridge (#2) into the valve body (#4). Step 3. Thread the cartridge nut (#1) back in. Step 4. The top of the cartridge stem (#4) matches the profile inside the stem extension (#2). Reinstall the stem extension (#2) onto the cartridge (#3). |
For additional information on Moen products visit solutions.moen.com and select the type of product you are repairing. The guide will contain repair details, troubleshooting and specific information on assembling handles associated with that style of product.
Still Not Finding What You're Looking For?
Contact Us or Call 1-800-BUY-MOEN
Non US? Moen Canada | Other International Sites