200758 and 200759 Cartridge: U231 or U361 Independent Transfer Valves
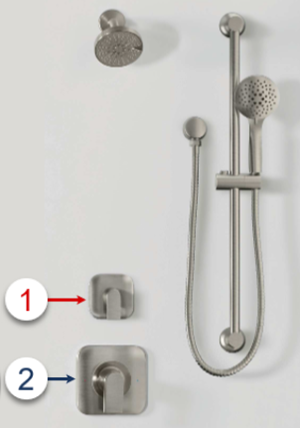 |
A transfer valve directs water flow from one showering device to another. This article will provide step-by-step instructions on replacing the 200758 or 200759 diverter cartridges in the M-Core Vertical Spa U231 and U361 Transfer valves.
How do I know which valve in my showering system is the transfer valve?
Replacing the 200758 or 200759 cartridge will require disassembling the transfer valve. |
|
The replacement of the cartridge will require the handle to be removed prior to beginning. For additional information on removing your handle or identifying your handle mechanism, see Vertical Spa: Independent Transfer Valves. Preparation:
|
|
Removing the Escutcheon Plate: |
|
|
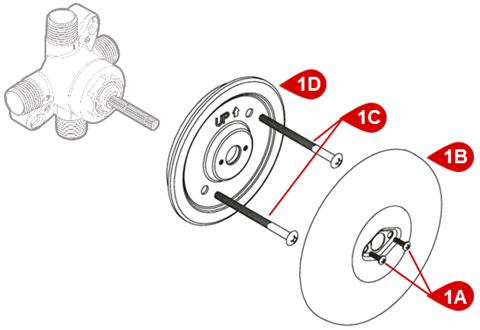
Disassembly: 1. Using a Phillips screwdriver, unthread the two escutcheon screws (#1A) counter-clockwise. 2. Slide off the escutcheon plate (#1B) Note: There may be some caulking on the wall around the escutcheon plate (#1B) which can cause some resistance. 3. Remove the mounting plate (#1D) by using a Phillips screwdriver to unthread the two mounting plate screws (#1C) counter-clockwise. Assembly: 1. To reinstall the escutcheon plate (#1B), follow steps 1-3 in reverse order. |

Cartridge Replacement: |
Removing the Cartridge |
|
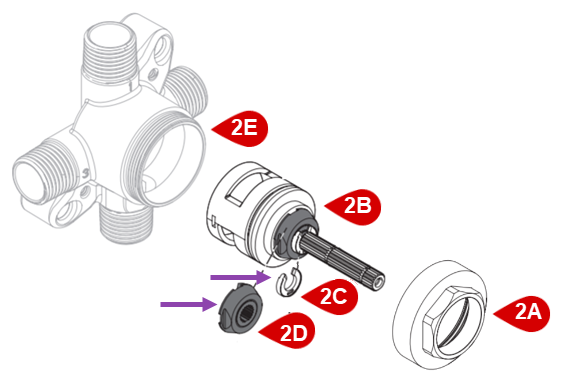
Note: The retaining clip (#2C) and limiter (#2D) are not used in all installations. |
1. Using an adjustable wrench, unthread the cartridge nut (#2A) counter-clockwise. 2. Slide the cartridge (#2B) out of the valve body (#2E). The retaining clip (#2C) and the limiter (#2D) are not used on all installations. If these parts are installed, they will remove with the cartridge (#2B).
|
Determining How Many Showering Devices are in Your Shower System |
|
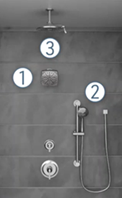
The assembly instructions vary based on your system configuration. Begin by reviewing the following images to determine if you have a 2 or 3 device system. |
|
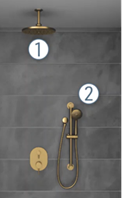
Reinstalling the Cartridge in a 2 Device System |
|
|
|
|


Reinstalling the Cartridge in a 3 Device System |
|
|
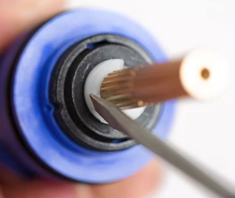
1. Remove the retaining clip (#2C) from the cartridge (#2B) by inserting a pick into the small notch on the top of the retaining clip (#2C) and carefully pry the retaining clip (#2C) off the stem of the cartridge (#2B).
2. Slide the limiter (#2D) off the stem of the cartridge (#2B). |
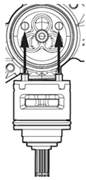
3. There are two feet on the back of the cartridge (#2B) that align with two notches inside the valve body (#2E). Align the feet with the notches and slide the cartridge (#2B) into the valve body (#2E).
|
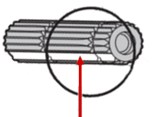
4. Thread the cartridge nut (#2A) on by hand and then use an adjustable wrench to tighten. 5. Rotate the stem of the cartridge (#2B) so the side with the missing spline is pointing down.
|


For additional information on Moen products visit solutions.moen.com and select the type of product you are repairing. The guide will contain repair details, troubleshooting and specific information on assembling handles associated with that style of product.
Still Not Finding What You're Looking For?
Contact Us or Call 1-800-BUY-MOEN
Non US? Moen Canada | Other International Sites