Maintenance: How to Clean a 1423 Balancing Spool- Moentrol with Integrated Transfer Valve
Preparation:
- The water supply shut off valves must be turned off- see article How to Turn Off the Water Supply to the Faucet.
- Recommended Tools: Phillips Screwdriver, Flathead Screwdriver, Soft Brush, Small Bowl, White Vinegar
- The following instructions assume the handle and associated handle pieces have been removed. For additional details, visit Vertical Spa: Moentrol with Integrated Transfer Valve and select the type you are repairing. The faucet guide will contain specific information on handle assemblies associated with that style of product.
- We recommend covering the drain before beginning so to not loose any parts down the drain.
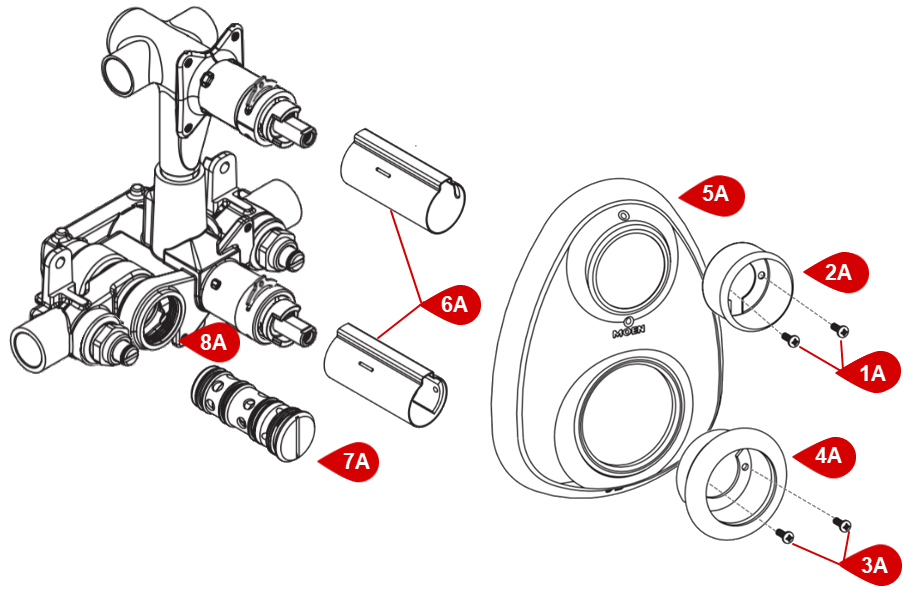
Egg-Shaped Escutcheon Plate (Prior to 2007):
Disassembly: 1. Remove the upper mounting cup (#2A), use a Phillips screwdriver to unthread the upper mounting cup screws (#1A) counter-clockwise. Repeat this step for the lower mounting cup (#4A) and lower mounting cup screws (#3A). Note: The stop tubes (#6A) may come off with the mounting cups (#2A and #4A). If they are still attached, they do not need to be removed for this process. 2. Slide off the escutcheon plate (#5A). 3. To remove the balancing spool (#7A), use a large flathead screwdriver to unthread the balancing spool (#7A) from the valve body (#8A). This will require about six full rotations before you can pull the balancing spool (#7A) from the valve body (#8A). Cleaning the Balancing Spool: 1. Using a 50/50 solution of white vinegar and water, swish the balancing spool (#7A) around in the solution and allow it soak for 5-7 minutes. Use a tooth brush to clean the outside of the balancing spool (#7A). Once this is done, shake the balancing spool (#7A). It should rattle like there is a metal ball inside (similar to the sound a spray paint can makes when you shake it). If there is no sound, the balancing spool (#7A) will need to be replaced, reinstall the current balancing spool (#7A) until you are ready to install a new one. Note: Without a balancing spool installed, the water cannot be turned back on. Assembly: 1. Slide the balancing spool back (#7A) into the valve body (#8A), using the Flathead screwdriver, screw it back down into the valve body (#8A). If the stop tubes (#6A) came off during disassembly, slide them back onto the valve body (#9A). 2. Position the escutcheon plate (#5A) with the word "Moen" upright and slide it onto the valve body (#8A). 3. Position the upper mounting cup (#2A) so the screw holes lines up with the screw holes on the valve body (#8A). While holding the upper mounting cup (#2A) in position, use a phillips screwdriver to thread the upper mounting cup screws (#1A). Repeat this step with the lower mounting cup (#4A) and lower mounting cup screws (#3A) |
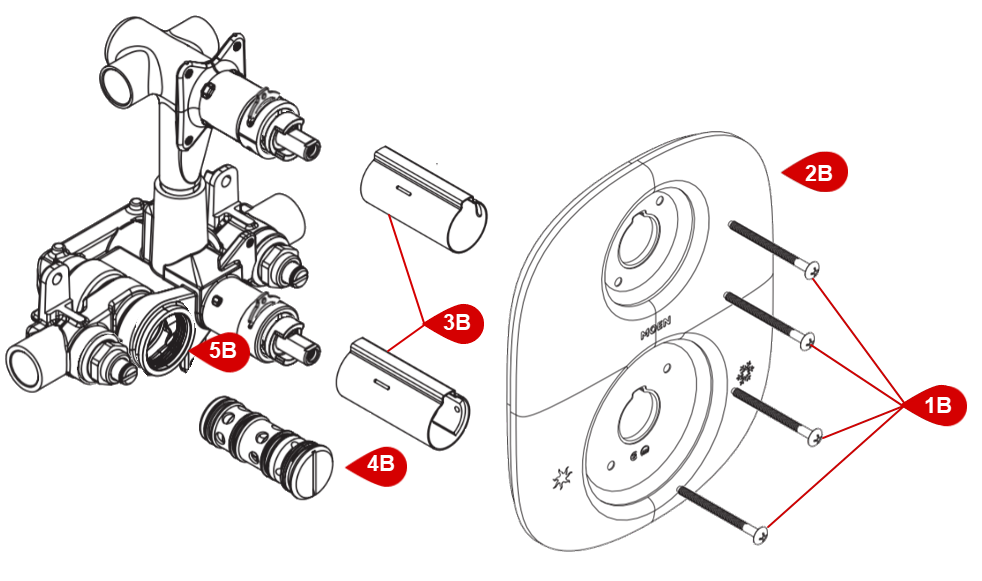
Oval-Shaped Escutcheon Plate (After 2007):
Disassembly: 1. To remove the escutcheon plate (#2B), use a Phillips screwdriver to unthread each of the four escutcheon screws (#1B) counter-clockwise. Note: The stop tubes (#3B) may come off with the escutcheon plate (#2B). If they are still attached, they do not need to be removed for this process. 2. To remove the balancing spool (#4B), use a large flathead screwdriver to unthread the balancing spool (#4B) from the valve body (#5B). This will require about six full rotations before you can pull the balancing spool (#4B) from the valve body (#5B). Cleaning the Balancing Spool: 1. Using a 50/50 solution of white vinegar and water, swish the balancing spool (#4B) around in the solution and allow it soak for 5-7 minutes. Use a tooth brush to clean the outside of the balancing spool (#4B). Once this is done, shake the balancing spool (#4B). It should rattle like there is a metal ball inside (similar to the sound a spray paint can makes when you shake it). If there is no sound, the balancing spool (#4B) will need to be replaced, reinstall the current balancing spool (#7A) until you are ready to install a new one. Note: Without a balancing spool installed, the water cannot be turned back on. Assembly: 1. Slide the balancing spool back (#4B) into the valve body (#5B), using the Flathead screwdriver, screw it back down into the valve body (#5B). If the stop tubes (#6A) came off during disassembly, slide them back onto the valve body (#9A). 2. Position the escutcheon plate (#2B) so the word "Moen" appears upright and slide it onto the valve body (#5B). 3. Using a Phillips screwdriver, thread each of the four escutcheon screws (#1B) clockwise until tight |
For additional information on Moen products visit solutions.moen.com and select the type of product you are repairing. The guide will contain repair details, troubleshooting and specific information on assembling handles associated with that style of product.
Still Not Finding What You're Looking For?
Contact Us or Call 1-800-BUY-MOEN
Non US? Moen Canada | Other International Sites