Moen Solutions

1224 Cartridge:Two Handle 8" Wide Spread Valves (2000-2014)

This article will walk you through the process of replacing the internal water flow cartridge(s) in a large two handle 8" spread lavatory faucet. The 8" spread pertains to the measurement from the center of the hot handle to the center of the cold handle. The information will include details about the tools needed and the method of removal

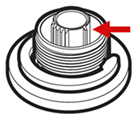
If your stem extension does not have splines all around the top, do not proceed (these are not the correct instructions or parts for your version).  See  article 1234 Cartridge: Two Handle 8" Wide Spread Valve (After Dec 2014)  for replacing a 1234 cartridge.
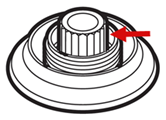
Splines:

1224 stem extension.png

Partial Splines:

1234 stem extension.png

Preparation:

  • The water supply shut off valves must be turned off- see article  How to Turn Off the Water Supply to the Faucet .
  • The following instructions assume the handle and associated handle pieces have been removed. For additional details, visit solutions.moen.com and select the type you are repairing. The faucet guide will contain specific information on handle assemblies associated with that style of product.

Recommended Tools: Phillips Screwdriver, Needle-Nose Pliers and/or Removal Tool 14272

Widespread 1224 valves 2000-2003.png

Disassembly Using Needle-Nose Pliers:

clipboard_e76096250b3235c4f7d5bb41a048e23e9.png

  1. Using a Phillips screwdriver, unthread the Phillips screw (#1). Lift the stem extension (#2) out. 
  2. Insert needle nose pliers into the valve body (#5) so they are in the recesses in the cartridge nut (#3). Unscrew the cartridge nut (#3) counter-clockwise to remove.
  3. Using pliers, grab the white stem of the cartridge (#4) and pull the cartridge (#4) out.

Disassembly Using Removal Tool 14272:

2020-08-31_10-10-13.png

  1. Use the removal tool 14272 to unthread the cartridge nut (#3).
  2. Using pliers, pull up on the stem extension (#2) which will also pull the cartridge out (#4).
  3. To separate the stem extension (#2) from the cartridge (#4), use a Phillips screwdriver and unthread the Phillips screw (#1) from within the stem extension (#2).

It is recommended to clean and flush the valve body (#4) prior to installing the new cartridge (#3). See Valve Body Cleaning and Flushing for additional details.

Assembly:

  1. Align the tab on the side of the cartridge (#4) with the notch down inside the wall of the brass valve body (#5) and slide the cartridge (#4) into the valve body (#5).
  2. Rotate the stem of the cartridge (#4) to the correct position for the side you are working on, see picture below for the orientation.
    clipboard_e1730b1f4aed95bbfa3be7997d863a7a4.png
  3. Thread the cartridge nut (#3) back in using  pliers or the removal tool (14272).
  4. The top of the cartridge stem (#4) matches the profile inside the stem extension (#2). Reinstall the stem extension (#2) onto the cartridge (#4).

For additional information on Moen products visit solutions.moen.com and select the type of product you are repairing. The guide will contain repair details, troubleshooting and specific information on assembling handles associated with that style of product.


Still Not Finding What You're Looking For?

Contact Us or Call 1-800-BUY-MOEN           

Non US?  Moen Canada | Other International Sites 

  • Was this article helpful?