This article will explain how to replace the internal water flow cartridge in a Moen single handle lavatory sink faucet. The information will include details about the tools needed and the process of removing the cartridge.
Preparation:
- The water supply shut off valves must be turned off- see article How to Turn Off the Water Supply to the Faucet.
- Recommended Tools: Pliers, Flathead Screwdriver
- The following instructions assume the handle and associated handle pieces have been removed. For additional details, visit solutions.moen.com and select the type you are repairing. The faucet guide will contain specific information on handle assemblies associated with that style of product.
|
|
Disassembly:
|
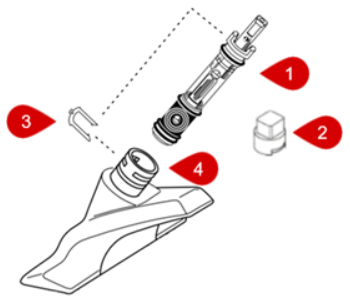
If the retainer clip has not been removed yet, use a flathead screwdriver to slide the copper retainer clip (#3) out of the valve body (#4). Note: The retainer clip (#3) could be installed from the front or the back of the faucet
|
1. Using the plastic twisting tool (#2), provided in the 1225 cartridge kit, rotate the cartridge (#1) 1/4 of a turn (90 degrees) in either direction to help loosen the cartridge (#1).

|
2. Remove the twisting tool (#2) and raise the stem of the cartridge (#1) until it stops. Using pliers, grab the stem of the cartridge (#1) and pull the cartridge (#1) out. This may require some effort. Note: It is recommended to clean and flush the valve body (#4) prior to installing the new cartridge (#1). See Valve Body Cleaning and Flushing for additional details. |
|
Assembly:
|
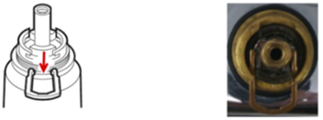
1. Slide the new cartridge (#1) into the valve body (#4). Use the twisting tool to apply pressure to push the cartridge (#1) completely into the valve body (#4). The plastic tabs on the cartridge (#1) must be flush with the valve body (#4). The plastic tabs on the cartridge (#1) must be centered on the cut outs on the valve body (#4), which are located at the 12 and 6 o'clock positions.
|
2. Gently slide the retainer clip (#3) back into the valve body (#4) on top of the cartridge (#1). If you encounter any resistance, do not force the retainer clip (#3). The cartridge (#1) may not be properly aligned, see step 1. If the retainer clip (#3) cannot be installed for any reason or appears to be damaged or broken, the water cannot be turned back on to the faucet until the retainer clip (#3) is replaced.
|
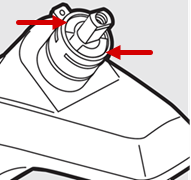
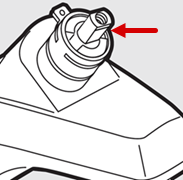
3. Rotate the stem of the cartridge (#1) so the small notch is facing forward. If the hot and cold are reversed, rotate the stem of the cartridge (#1) 180 degrees.
|
|
For additional information on Moen products visit solutions.moen.com and select the type of faucet you are repairing. The faucet guide will contain repair details, troubleshooting and specific information on assembling handles associated with that style of product.
Still Not Finding What You're Looking For?
Contact Us or Call 1-800-BUY-MOEN
Non US? Moen Canada | Other International Sites