Faucet Aerator Cleaning
Moen produces a variety of faucet aerators.They install differently and provide a variety of flow patterns and dispense the water at different flow rates. The guide below will help you identify and service the aerator on your Moen faucet.
Q: Why do I need to service an Aerator?
A: Over time, aerators can accumulate debris and mineral deposits, which can restrict water pressure or distort the spray pattern. Cleaning the aerator may improve faucet performance.
Q: Are all Aerators designed the same?
A: The basic function is the same.However, they vary by design, flow rate, how they shape the water and how they attach to the spout.
| Key Legend: | |
|---|---|
|
|

Q: How do I Identify my Aerator?
A: Below are the 3 most common types of aerators.
Type 1: Exposed Aerators |
This style of aerator uses an exterior shell (1) to contain the aerator pill (2).
| Type of Aerator | Description | How to Remove |
|---|---|---|
|
Male Threaded Aerator  |
The Male Threaded Aerator has external threads on the outside of the exterior shell (1). |
Unthread by turning clockwise
|
|
Female Threaded Aerator |
The Female Threaded Aerator has internal threads within the exterior shell (1).
|
Unthread by turning counter-clockwise
|

Type 2: Concealed Aerator |
The concealed aerator (3) is generally not visible and will require a tool for removal. There are several types of concealed aerator (3), Moen recommends using a mirror to closely compare the details.
| Type of Aerator | Description | How to Remove |
|---|---|---|
|
Round Concealed with Indentations Tool Required: Supplied with faucet or service kit.
|
This round aerator has indentations located around the face of the concealed aerator (3). |
The teeth on the removal tool (4) will fit into the indentations on the aerator pill (2). Unthread counter-clockwise to remove, click here for more details.
|
|
Round Concealed with 4 Indentations Tool Required: Supplied with faucet or service kit.
|
This round aerator has 4 indentations spaced evenly around the face of the concealed aerator (3).
|
You will need to place the slot of the provided removal tool (4) so it fits across 2 of the indentations. Unthread counter-clockwise to remove, click here for more details. |
|
Oval Concealed with 1 Hex Screw Tool Required: 1/8" Hex Wrench
|
This oval shaped aerator has a Hex Screw located in the middle of the concealed aerator (3).
|
Requires a 1/8" Hex Wrench to remove, click here for more details.
|
|
Oval Concealed with 1 Hex Screw, Version 2 Tool Required: 5/64" Hex Wrench
|
The oval shaped aerator has a Hex Screw located in the back of the concealed aerator (3).
|
Requires a 5/64" Hex Wrench to remove the Hex Screw, click here for more details.
|
|
Oval Concealed No Visible Screw Hole Tool Required: 7/64" Hex Wrench
|
This oval shaped aerator has two concealed hex screws that connect it to the spout body. The faucet style includes a removable part on the underside of the faucet spout, commonly referred to as the faucet throat.
|
You will first need to gently pry the faucet throat away from the underneath of the spout. There are 4 tabs that hold this in place. Next you will need a 7/64" Hex Wrench to remove the 2 hex screws located on either side of the aerator. Once these are removed, you will be able to remove the aerator, click here for more details.
|
|
Oval Concealed No Visible Screw Hole, Version 2 Tool Required: Needle Nose
|
This oval shaped aerator is a press-fit design with no screws. There are two fins that securely hold it into place.
|
To remove the concealed aerator (3) you will need to place Needle Nose Pliers in the middle of the aerator and gently pull the aerator straight out, click here for more details.
|


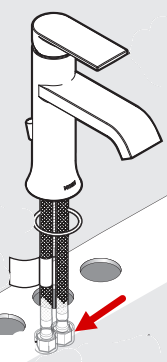
Type 3: Non-Accessible Aerators - No Visible Aerator at the end of the Spout |
 |
Some faucets have an open waterway with no visible aerator/screen. Because of this, these types of Moen faucets include In-Line Filters located at the end of each Supply Line.These can be cleaned the same way you would an aerator. |
|
In-Line Filter: Style 1
|
Removal of the In-Line Filter Style 1
|
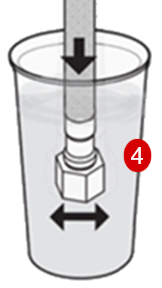
How to clean your In-Line Filter Style 1
Reattach supply lines reversing the process in previous step |
|
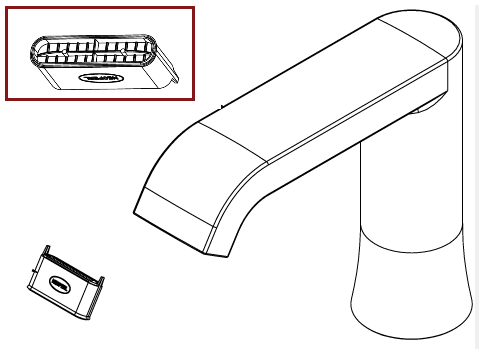
In-Line Filter: Style 2
|
Removal of the In-Line Filter Style 2
|
How to clean your In-Line Filter Style 2
Reattach supply lines reversing the process in previous step. |


| If low flow persists, see article Bathroom Faucet: Low Flow or Kitchen Faucet: Low Flow. For additional troubleshooting information on Moen products visit Solutions.moen.com. |
Still Not Finding What You're Looking For?
Contact Us or Call 1-800-BUY-MOEN
Non US? Moen Canada | Other International Sites