Installing a Handshower on a Slidebar
Preparation:
Video: Handshower On A Slidebar Installation
Recommended Tools: Adjustable Wrench, Phillips Screwdriver, Flathead Screwdriver, Drill, Drill Bits, Tape Measure, Level, Pencil
|
|
Installation:1. Determine where the slidebar assembly is going to be located. Use a level and a pencil to mark the location of the screw holes. 2. Drill a 5/16" pilot hole to determine if there's a stud.
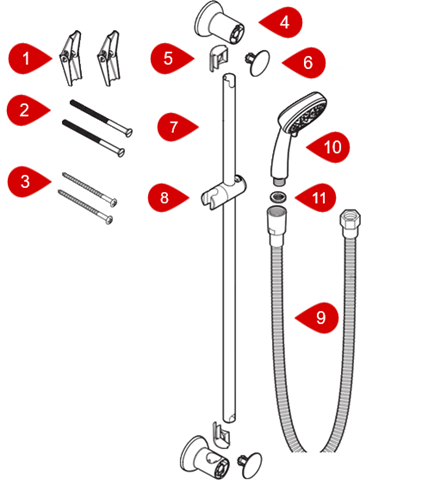
3. If your model has slide bar caps (#5) slide one in the top of the slidebar (#7) and the other in the bottom of the slidebar (#7). Not all models have slide bar caps (#5). 4. Align the notch in the top of the slidebar (#7) with the groove in the post (#4). Slide the top of the slidebar (#7) into the post (#4) making sure the button on the slider (#8) is facing up. 5. Use either the wood screws (#3) or the toggle bolts (#1) and bracket screws (#1) to secure the slide bar and post to the wall. If using the anchors (#1), slide the bracket screw (#2) through the post (#4) and thread the anchor (#1) onto the end of the bracket screw (#2) a few turns. Pinch the ends of the anchor (#1) against the bracket screw (#2) when inserting into the wall. Tighten the screws.
6. Snap the decorative post caps (#6) into the front of the posts (#6). 7. Thread the rounded end of the hose (#9) into the handshower (#10). 8. Insert the washer (#11) into the hexagonal end of the hose (#9). This end will thread on to either a drop ell or a shower arm diverter and tighten with an adjustable wrench. See "Related Articles" for installing a drop ell. |

For a comprehensive guide, visit solutions.moen.com and select the type of product you are repairing. The guide will contain specific information associated with that style of product.
Still Not Finding What You're Looking For?
Contact Us or Call 1-800-BUY-MOEN
Non US? Moen Canada | Other International Sites