Moen Solutions

My Shower Handle is Not Sitting in the Original Position After Installing the 90274

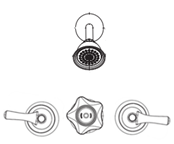
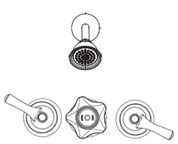
This article explains how to correct your shower faucet handle if it is not sitting in the original position after installing 90274. Version 1 is single piece stem extension used in knob handles. Version 2 is a two piece stem extension used in lever handles.

Correct

2020-09-23_15-24-12 a.png

Incorrect

2020-09-23_15-24-12.png

Preparation:

 Step 1-Remove the handle.

 Two or Three Handle Shower- Cap Knob

2020-09-23_15-56-37.png

Two or Three Handle Shower- Cap Lever

2020-09-23_15-59-55.png

Disassembly:

  1. Pull the handle cap (#1) out of the handle (#3) and unthread the Phillips screw (#2) using a Phillips screwdriver.
  2. Remove the handle (#3) and slide the wall tube (#4) out.

Assembly:

Follow the steps in reverse order starting with #4.

Step 2-Reposition the stem extension.


2020-09-23_14-55-58.png

Symbol Key Legend
clipboard_ec3efcf00f5826f490c53e0e2916df46e.png Unthreads
2020-09-23_14-56-54.png Lifts Off

1. Remove the cartridge nut (#1) and the upper stem extension (#2a). Note: If you have a two piece cartridge nut, only remove the upper portion which is threaded at the bottom.

2. To replace the upper stem extension (#2a), turn your handle upside down. Notice the  "D" shaped profile in the handle (see image below). This will match the profile at the top of the stem extension (#2a). Place the upper stem extension (#2a) into the handle. Set the handle with the upper stem extension (#2a) onto the faucet. In a standard shower faucet installation, the hot handle will face the 9:00 position and the cold handle will face the 3:00 position. If the handles are not aligned in these positions, remove the handle and adjust the upper stem extension to modify the position. Note: The upper stem extension (#2a) has small teeth on the bottom that line up with the indents on the top of the lower stem extension (#2b) to allow for small positioning adjustments. Place the handle back onto the upper stem extension. If you have corrected the handle orientation, proceed to step 3. If the handle orientation has not been corrected, repeat step 2.

clipboard_e871f3c7216fb700284f8d2b5dd52a11c.png

3. Remove the handle.

4. Install the cartridge nut (#1) being careful not to cross thread it. Begin by hand tightening the cartridge nut (#1) then finish using a pair of pliers.

5. Install the handle (see  Step 1-Remove the handle above in reverse order). 

Correct

2020-09-23_15-24-12 a.png

For additional details, visit Two or Three Handle Shower: Standard Valves and select the type you are repairing. The faucet guide will contain specific information on handle assemblies associated with that style of product.


Still Not Finding What You're Looking For?


Contact Us or Call 1-800-BUY-MOEN           

Non US?  Moen Canada | Other International Site