Press and Mark Hardware System
- Last updated
-
-
Save as PDF
This article will give step-by-step instructions for the Moen Press and Mark Hardware system.
|
|
Installation:
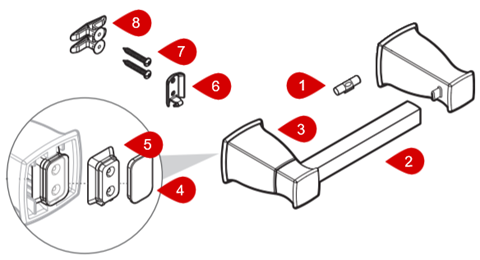
- Remove the backing on the level (#1). Center the level (#1) onto the bar (#2) and press firmly to adhere the level (#1) to the bar (#2).
- Remove the covers (#4) from the ink stamps (#5) on the back of the posts (#3).
- Confirm that the set screw holes on the posts (#3) are facing down and push the posts (#3) firmly and evenly against the wall.
- Follow one of the two options for drilling the holes in the wall.
Wood Stud Option
Drill 1/16" holes on the ink stamp marks.
|
Hollow Wall Option
Drill 5/16" holes on the ink stamp marks and insert a drywall anchor (#8) into each hole.
|
- Confirm that the arrow on each of the mounting brackets (#6) is facing up. Thread and tighten the Phillips screws (#7) through the mounting brackets (#6) and into either the wall or to the drywall anchor (depending on what was done in step 5).
- Remove the level (#1) and ink stamps (#5).
- Attach the posts (#3) one at a time pushing the posts downward and to the wall.
|
For a comprehensive guide, visit solutions.moen.com and select the type of product you are repairing. The guide will contain specific information associated with that style of product.
Still Not Finding What You're Looking For?
Contact Us or Call 1-800-BUY-MOEN
Non US? Moen Canada | Other International Sites