This article will explain the process for installing a Moen Set Screw Hardware system.
Preparation:
|
|
|
Installation:
- Position and level the paper mounting template (included with the fixture, you may want to cut the end with the instructions off first) in the desired location on the wall. Tape it to the wall.
- Drill 5/16" holes at each mounting post location that corresponds to your product. Remove the template from the wall.
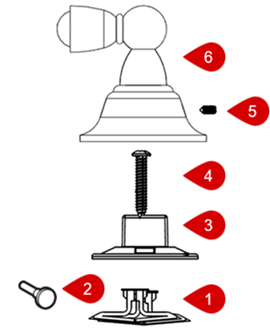
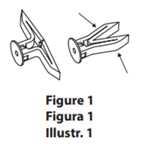
- Fold the ends of the anchor (#1) together and insert into the hole. See "Figure 1". Lightly tap the anchor (#1) with a hammer until it is flush with the wall.
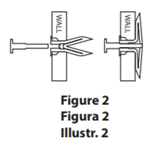
- Insert the plastic pin (#2) into the anchor (#1) to open it up behind the wall. Remove the pin (#2). See "Figure 2".
- Loosen the set screws on the bottom of the fixture (#6) and remove the mounting post (#3).
- Place the mounting post (#3), with "Up" at the top, over the anchor (#1) and use a Phillips screwdriver to thread and tighten the Phillips screw (#4) through the mounting post (#3) and into the anchor (#1).
| Repeat steps 3-6 for multiple posts. |
- Place the fixture post (#6) over the mounting post (#3) and tighten the set screw (#5) at the bottom of each fixture post (#6).
|
|
|
For a comprehensive guide, visit solutions.moen.com and select the type of product you are repairing. The guide will contain specific information associated with that style of product.
Still Not Finding What You're Looking For?
Contact Us or Call 1-800-BUY-MOEN
Non US? Moen Canada | Other International Sites