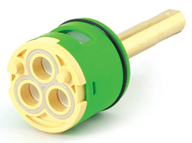
163127 Cartridge: 3360 or 3362 Independent Transfer Valves
- Last updated
-
-
Save as PDF
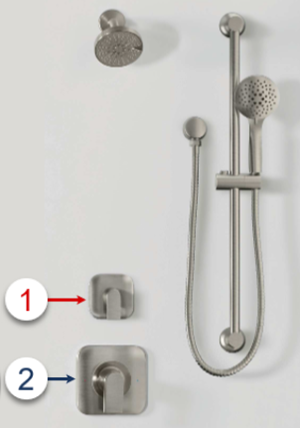 |
A transfer valve directs water flow from one showering device to another. This article will provide step-by-step instructions on replacing the 163127 diverter cartridge in the 3360 or 3362 Transfer valves.
How do I know which valve in my showering system is the transfer valve?
- #1 Transfer Valve: The transfer valve is usually installed above the mixing valve and characteristically has a smaller trim plate. When the mixing valve is turned on, the transfer valve handle can be rotated to activate the individual showering devices to function independently or simultaneously, depending on the valve.
- #2 Mixing Valve: The mixing valve is housed behind the handle or knob in your shower and is responsible for turning the water supply to the entire system on and off. It is usually installed below the transfer valve and characteristically has a larger trim plate.
Replacing the 163127 cartridge will require disassembling the transfer valve.
|
Preparation:
- The water supply must be turned off- see article How to Turn Off the Water Supply to the Faucet.
- Recommended Tools: Adjustable Wrench, Pliers, Phillips Screwdriver
- The following instructions assume the handle and associated handle pieces have been removed. For additional details, visit Vertical Spa: Independent Transfer Valves and select the type you are repairing. The faucet guide will contain specific information on handle assemblies associated with that style of product.
- We recommend covering the drain before beginning so as to not lose any parts down the drain.
|
3360 (3F Commercial: 3 Independent) or 3362 (3F:3 Independent): 163127
|
Now that the handle has been removed and the handle mechanism type identified, you will need to remove the escutcheon (backplate) to replace the cartridge. If you are unsure which one your transfer valve uses, see Vertical Spa: Independent Transfer Valves to learn more about the different mechanisms. The instructions below will provide step-by-step instructions based on the handle mechanism type.
|
How to Remove Your Escutcheon: 2 Types
|
|
Escutcheon: Handle Mechanisms Type C and F
|
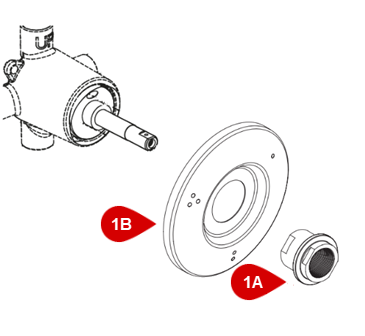
Disassembly:
1. To remove the escutcheon plate (#1B), position an adjustable wrench on the two flat sides of the mounting sleeve (#1A). Unthread it counter-clockwise wise and pull it forward to remove
2. Slide off the escutcheon plate (#1B). Note: There may be caulking on the wall around the escutcheon plate (#1B) which may cause some resistance.
3. Continue to Cartridge Replacement.
Assembly:
1. To reinstall the escutcheon plate (#1B), follow steps 1-2 in reverse order.
|
|
|
Escutcheon: Handle Mechanism Type I
|
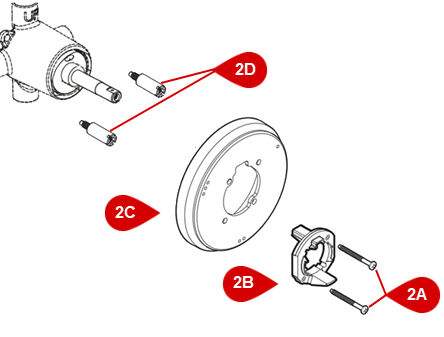
Disassembly:
1. To remove the mounting bracket (#2B), use a Phillips screwdriver to unthread each of the screws (#2A) counter-clockwise. Remove the mounting bracket (#2B).
2. Slide off the escutcheon plate (#2C). Note: There may be some caulking on the wall around the escutcheon plate (#2C) which can cause some resistance. The standoff screws (#2D) do not need to be removed for this process.
3. Continue to Cartridge Replacement.
Assembly:
1. To reinstall the escutcheon plate(#2C), follow steps 1-2 in reverse order. Note: Install the mounting bracket (#2B) in the same orientation before it was removed (see image above).
|
|
|

Disassembly:
Note: It is not necessary to remove the handle bushing (#3A) for this installation. If the handle bushing (#3A) is loose, remove it and set it aside for assembly.
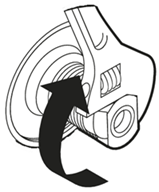
1. Place an adjustable wrench on the two flat sides of the handle extension (#3B) and unthread it counter-clockwise to remove.
2. Using pliers, grab the stem of the cartridge (#3C) and pull the cartridge (#3C) out of the valve (#3D).
Note: It is highly recommended to clean and flush the valve body (#3D) before installing the new cartridge (#3C). See Valve Body Cleaning and Flushing for additional details.
|
Assembly:
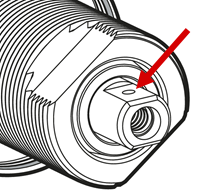
| 1. Position the cartridge (#3C) so the two feet on the bottom of the cartridge line up with the two matching indents inside the valve body. Slide the cartridge (#3C) into the valve body (3D). |
 |
| 2. Place an adjustable wrench on the two flat sides of the handle extension (#3B) and thread it clockwise back onto the valve (#3D). Note: If the handle bushing (#3A) was removed, slide it back into the handle extension (#3B). |
 |
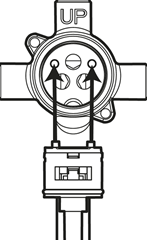
| 3. Ensure the recessed circle on the stem of the cartridge (#3C) is facing up toward the 12 o'clock position. Move back to How to Remove Your Escutcheon: 2 Types for information on installing the escutcheon. |
 |
|
For additional information on Moen products visit solutions.moen.com and select the type of product you are repairing. The guide will contain repair details, troubleshooting and specific information on assembling handles associated with that style of product.
Still Not Finding What You're Looking For?
Contact Us or Call 1-800-BUY-MOEN
Non US? Moen Canada | Other International Sites