Moen Solutions

My Faucet Handle is Not Sitting in the Original Position After Installing the 90274

clipboard_e321bf2fc9dcd08408fad3efe54a34493.png

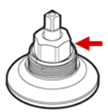
This article is based on a stem extension with a "D" shaped profile. Widespread valves began using this stem extension prior to 2000. If you are unsure the above image is your version, see  Two Handle 8" Wide Spread: Lever or Two Handle 8" Wide Spread: Knob for details.

Correct

clipboard_e8d2cc019001e024e1477d73e726ed97b.png

Incorrect

clipboard_e51bd6a34b109deec02bee919523b33df.png

Preparation:


clipboard_e24a24133587aa19fbe193e7faed71c89.png

Symbol Key Legend
clipboard_eb0900c256de7a485e7046d2968773e82.png Unthreads
pulls off.png Lifts Off

1. Remove the cartridge nut (#1) and the upper stem extension (#2a). Note: If you have a two piece cartridge nut, only remove the upper portion which is threaded at the bottom.

2. To replace the upper stem extension (#2a), turn your handle upside down. Notice the  "D" shaped profile in the handle (see image below). This will match the profile at the top of the stem extension (#2a). Place the upper stem extension (#2a) into the handle. Set the handle with the upper stem extension (#2a) onto the faucet. In a standard faucet installation, the hot handle will face the 9:00 position and the cold handle will face the 3:00 position. If the handles are not aligned in these positions, remove the handle and adjust the upper stem extension to modify the position. Note: The upper stem extension (#2a) has small teeth on the bottom that line up with the indents on the top of the lower stem extension (#2b) to allow for small positioning adjustments. Place the handle back onto the upper stem extension. If you have corrected the handle orientation, proceed to step 3. If the handle orientation has not been corrected, repeat step 2.

clipboard_e871f3c7216fb700284f8d2b5dd52a11c.png

3. Remove the handle.

4. Install the cartridge nut (#1) being careful not to cross thread it. Begin by hand tightening the cartridge nut (#1) then finish using a pair of pliers.

5. Install the handle and handle screw. 

For additional details on Two Handle 8" Wide Spread faucets, visit  Tw Handle 8" Wide Spread: Lever or Two Handle 8" Wide Spread: Knob and select the type you are repairing. The faucet guide will contain specific information on handle assemblies associated with that style of product.


Still Not Finding What You're Looking For?


Contact Us or Call 1-800-BUY-MOEN           

Non US?  Moen Canada | Other International Site

  • Was this article helpful?