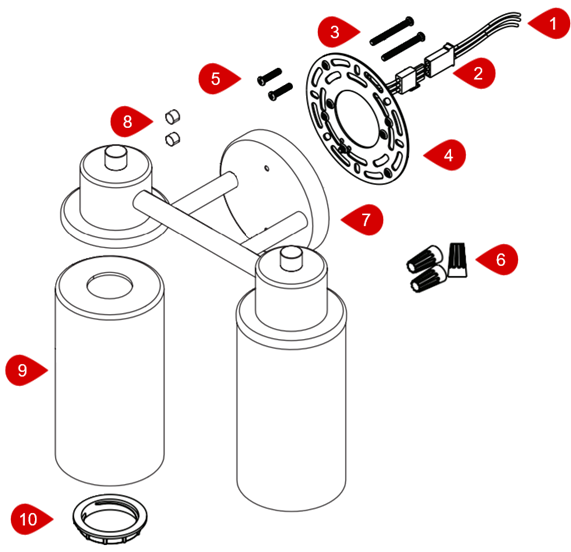
This article will provide step-by step instructions for installing Bathroom Light Fixtures.
Preparation:
 |
Installation:
- Turn off the main power supply to the bathroom it is being installed in. Test to confirm the power is off.
- Disconnect the quick connect wires (#2) from the new Moen light fixture.
- Use the wire nuts (#6) to connect the bare wire ends (#1) to the bare electrical box wires (black to black, white to white, green to green or bare). If there is no green or bare wire then attach the green wire to the green ground screw located on the mounting plate (#4).
- Wrap electrical tape around where the bare wires (#1) go into the wire nuts (#6).
- Thread the longer Phillips screws (#3) into the back of the mounting plate (#4) and confirm the long screws (#3) are level. The threaded end should be sticking out of the front of the mounting plate. (#4)
- Using a Phillips screwdriver and the shorter Phillips screws (#5), attach the mounting plate (#4) to the electrical box.
- Connect the Quick Connect wires (#2).
- Line up the holes on the light fixture (#7) with the threads on the longer screws (#3). Secure the light fixture (#7) to the longer screws (#3) by threading the decorative nuts (#8) onto the longer screws (#3) until the light fixture (#7) is secure.
- Remove the socket nut (#10) from the light fixture (#7), slide on the globe (#9) and thread the socket nut (#10) back in. If there is more than one globe, repeat this for each globe.
- Install light bulbs to each light and then restore the power to the bathroom.
|
For a comprehensive guide, visit solutions.moen.com and select the type of product you are repairing. The guide will contain specific information associated with that style of product.
Still Not Finding What You're Looking For?
Contact Us or Call 1-800-BUY-MOEN
Non US? Moen Canada | Other International Sites

