Moen Solutions

Cartridge Replacement: 1258 Handle Mechanism: Stem Extension (Short)

partial splines short with top view.png

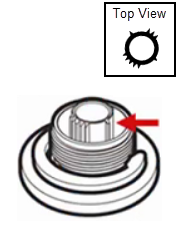
This article is based on a stem extension with partial splines on the outside and smooth inside. If you are unsure the above image is your version, see see Roman Tub Deck Mount: Lever or Roman Tub Deck Mount: Knob for details.

There are multiple cartridges used on Roman Tub faucets. Confirming which one you are working with will require removing the handle and identifying your handle mechanism. If these requirements have not yet been confirmed, see Roman Tub Deck Mount: Lever or Roman Tub Deck Mount: Knob for details at solutions.moen.com.

Preparation: 

  • The water supply shut off valves must be turned off- see article How to Turn Off the Water Supply to the Faucet.
  • Recommended Tools: Flathead Screwdriver, Needle-Nose Pliers and/or Removal Tool 14272
  • The following instructions assume the handle and associated handle pieces have been removed. For additional details, visit Roman Tub Deck Mount: Lever or Roman Tub Deck Mount: Knob and select the type you are repairing. The faucet guide will contain specific information on handle assemblies associated with that style of product.

partial splines smooth interior.png

Symbol Key Legend
clipboard_e3e683fea9f40f649230c3b79072c66d6.png Unthreads
clipboard_eaaff80fc4dc0b7904dc510ca3062f91c.png Pulls Out


For disassembly, follow the number of the parts in order starting with the cartridge nut (#1). To remove the cartridge nut (#1), use needle-nose pliers or removal tool 14272. Once removed, proceed to part #2.

Needle-Nose Pliers or Removal Tool 14272

clipboard_ef85491faa31639ca1b61657bb4273fd5.png

To disconnect the stem extension (#2) from the cartridge (#3), push on the side of the stem extension (#2) that has 5 splines to create a gap. Use a flathead screwdriver in the gap to pry the stem extension (#2) and cartridge (#3) apart.

It is recommended to clean and flush the valve body (#4) prior to installing the new cartridge (#3). See Valve Body Cleaning and Flushing for additional details.


For re-assembly, start by connecting the cartridge (#3) with the stem extension (#2). Once connected and installed, slide the cartridge (#3) and stem extension (#2) into the valve body (#4). Use pliers or the removal tool to thread and tighten the cartridge nut (#1).  Rotate the stem extension (#2) to the "off" position (clockwise for hot, counter clockwise for cold) until it stops.

insert cartridge.png

For additional information on Roman Tub Fillers visit Roman Tub Deck Mount: Lever or Roman Tub Deck Mount: Knob. For information on other Moen products visit solutions.moen.com and select the type of product you are repairing. The guide will contain repair details, troubleshooting and specific information on assembling handles associated with that style of product.


Still Not Finding What You're Looking For?

Contact Us or Call 1-800-BUY-MOEN           

Non US?  Moen Canada | Other International Sites