How to Remove a Bathroom Accessory
| There are four basic styles of mounting assemblies for Moen accessories. Review each of the following assemblies to confirm which version you are working with. |
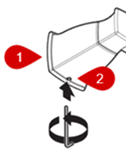
Set Screw:A set screw will be located in a screw hole on the base of the post(s).
Recommended Tools: 3/32" Hex Wrench
|
 |
EZ 2 Install:
There will be an opening with a tab located on the base of the post(s).
Collections Used With: Eastlake, Iso & Rockland
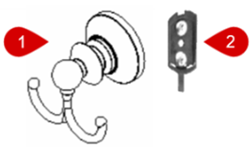
Recommended Tools: Flathead Screwdriver
Disassembly:
- Insert a small flathead screwdriver into the opening on the base of the fixture post (#1).
- Pull the screwdriver away from the wall to depress the tab and release the fixture so that you can now slide it up and off the mounting bracket (#2) and wall.
Assembly:
- Use a flathead screwdriver to depress the tab against the wall and slide the fixture up to unlock and remove.
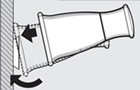
Pro Fit:
There will be an opening with no tab and no screw located on the base of the post(s).
Collections Used With: Brantford, Eva, Icon & Mason
Recommended Tools: Flathead Screwdriver
Disassembly:
- Insert a small flathead screwdriver into the small square opening on the base of the fixture post (#1).
- Push the screwdriver upwards while pulling the fixture post (#1) forwards to remove it from the wall.
Assembly:
- The opening on the fixture post (#1) must face down to line up with the locking tab.
- Press firmly on the fixture post (#1) until it clicks.
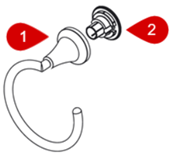
Securemount:
There will be an opening with a small tab located in the base of the post(s).
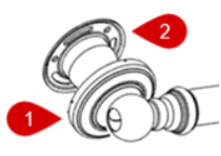
Recommended Tools: Phillips Screwdriver
Disassembly:
- Slide the escutcheon (#1) away from the wall.
- Using a Phillips screwdriver, unthread the Phillips screws from the bracket (#2).
Assembly:
- Use a Phillips screwdriver to thread the Phillips screws through the bracket (#2).
- Slide the escutcheon (#1) over the bracket (#2).
For a comprehensive guide, visit solutions.moen.com and select the type of product you are repairing. The guide will contain specific information associated with that style of product.
Still Not Finding What You're Looking For?
Contact Us or Call 1-800-BUY-MOEN
Non US? Moen Canada | Other International Sites