Kitchen Faucet 3-in-1 Water Filtration: Handle Assembly
Moen manufactures multiple different handle mechanisms with a threaded dome. The assembly process is different for each of them. This article will identify the differences and explain the assembly process.
Preparation:
- The water supply shut off valves must be turned off- see article How to Turn Off the Water Supply to the Faucet.
- Recommended Tools: 3/32" Hex Wrench
Suggested Articles:
Handle Disassembly |
 |
|
Now that you have the handle disassembled, you are ready to identify your Handle Mechanism. The easiest way to identify your handle mechanism is based on the interior parts that you just removed. See the descriptions below for assistance.
Part Lists and How to Identify your Handle Type |
Identifier:
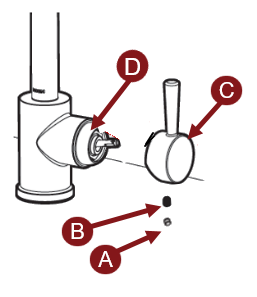
- Handle Type 1: The inside of the Handle Hub (D) will be hollow with internal threads (Fig 1). For instructions to reassemble your handle click here
- Handle Type 2: Unlike Handle Type 1, Handle Type 2 includes an additional piece inside the Handle Hub (D) (Fig 2). This piece is identified as the Bearing Ring (H) and will be either black or grey non-metallic piece. For instructions to reassemble your handle
|
|
|
Type 1 Handle Hub (D): Hollow with visible internal threads
Type 2 Handle Hub (D): Additional piece inside, Bearing Ring (H)
|
Re-Assembling your Handle: |
Handle Type 1 |
- Insert the Handle Hub (D) into the threaded end of the faucet body and rotate approximately a 1/4 turn clock-wise to lock into place.
- Slide the Handle (C) onto the stem of the Cartridge (F).
- Using a 3/32" Hex wrench, tighten the Handle Set Screw (B). Confirm the handle functions by rotating it in four directions. On/Off/Hot/Cold
- If the Handle Plug/Cap Button (A) is included with your model, insert it into the set screw hole in the bottom of your handle and push into place.
- Turn your water supply on, confirm that the flow is working properly. You are done!
Handle Type 2 |
Handle Assembly |
||
|---|---|---|
| Step 1:Confirm the Handle Hub Assembly is Assembled | Confirm your Handle Hub (D) and Bearing Ring(H) are securely snapped together ( Fig 3). | .png?revision=3) |
| How to Re-Assemble Bearing Ring & Handle Hub | While holding the Bearing Ring (E), line up the Tabs into the Slots on the Handle Hub (D).Connect the Bearing Ring (E) into the Handle Hub (D). |  |
| Step 2: Install the Handle Hub on the Faucet Body |
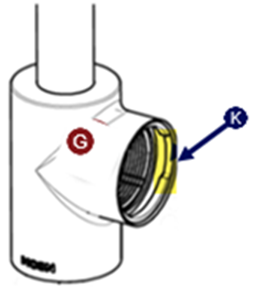
Line the Exterior Fins (J) with the Interior Valve Notch (K) of the Valve Body (G). Insert the Handle Hub Assembly into the Valve Body and rotate approximately a 1/4 turn clock-wise to lock it into place. Note: The Cartridge (F) and Cartridge Nut (E) are not shown in the image for easier illustration of the Interior Valve Notch (K) |
 |
| Step 3: Install the Handle |
|
|
For additional information on Moen products visit solutions.moen.com and select the type of product you are repairing. The guide will contain repair details, troubleshooting and specific information on assembling handles associated with that style of product.
Still Not Finding What You're Looking For?
Contact Us or Call 1-800-BUY-MOEN
Non US? Moen Canada | Other International Sites


.png?revision=3&size=bestfit&width=134&height=152)
