Kitchen Faucet 3-in-1 Water Filtration: Leaking Under The Sink Base
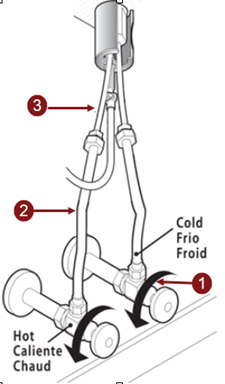
24/7 Leak:If the 3-in-1 Water Filtration Pulldown Kitchen Faucet is leaking under the sink 24 hours a day, use Figure 1 below to check the home shut off valves/angle stops (#1), the house supply lines (#2) that lead to the faucet and the Moen faucet supply lines (#3). When the leak is coming from from the house supply lines or the home shut off valves (#1 or 2), you will need to purchase those from your local home store. If the faucet is leaking from the Moen faucet supply lines (#3), contact us by calling 1-800-BUY-MOEN (1-800-289-6636). Intermittent Leak:If the 3-in-1 Water Filtration Pulldown Kitchen Faucet is only leaking under the sink after the faucet has been used, the issue would be from another of the under deck hoses/lines (Figure 2 and 3) . This faucet is paired with a Moen filtration system (F9800 Advanced Filtration or F9900 Reverse Osmosis) see Figure 3 for a detailed diagram of the under deck configuration. If you have the 3-in-1 Water Filtration Pulldown Kitchen Faucet paired with a F9900 Reverse Osmosis system installed, please see below for solution of a leak coming from the RO filter. For leaks from other hoses/lines or models contact us by calling 1-800-BUY-MOEN (1-800-289-6636).
|

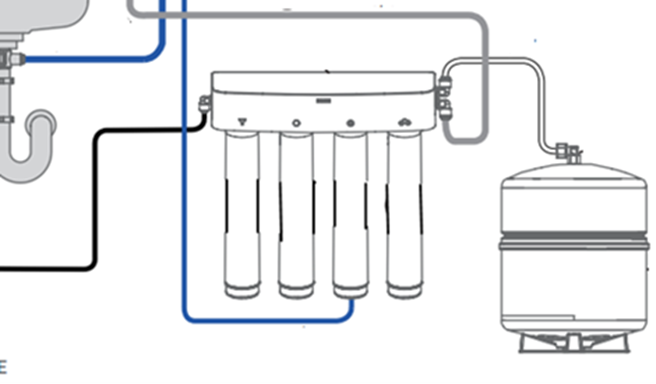
3-in-1 Water Filtration Pulldown Kitchen Faucet and F9900 Reverse Osmosis Installations:
Consumers who suspect a leak beneath the filter canister of the RO Filter (D) should first verify the correct assembly of the Flow Restrictor within the RO Filter (D). This crucial step in the installation process, performed after attaching the filters, is essential for preventing leaks in this area.
The RO Filter can be identified by the Elbow projecting from its base. The Flow Restrictor is situated inside the 1/4" tube connected to this Elbow.
Before proceeding with troubleshooting, it is advisable to confirm whether this is indeed the source of the leak. To do this, wrap a towel or rag around the base of the RO filter and turn on the faucet. If the towel becomes wet, this indicates that the leak is originating from this area, and you can then proceed with the troubleshooting steps.
How to verify you have installed the Flow Restrictor in your F9900 Reverse Osmosis System:
 |
|
- Ensure that the water supply shut-off valves are turned off. For detailed instructions, refer to the article How to Turn Off the Water Supply to the Faucet.
- Place a bucket, pan, or rag under the filtration system to catch any residual water.

- To release the 1/4" tube, gently depress the Elbow Retaining Ring (3) while pulling the 1/4" tube (J) out of the Elbow (4).

- After removing the 1/4" tube (J) , examine the opening at the end.
- Flow Restrictor (2) Installed:
- The Flow Restrictor (2) should be visibly protruding from the end of the 1/4" tube (J) .
- Ensure that the red collar of the Flow Restrictor (2) is seated against the tube, leaving 1/8" of the thin, clear tubing exposed.
- Flow Restrictor (2) Not Installed:
- If the 1/4" tube (J) is hollow, the Flow Restrictor (2) was not installed, which may be causing a leak from this area.
- The Flow Restrictor (2) is coiled and packaged between the top of the RO Filter (D) assembly and the Protective Cap.
- Please reference the installation guide INS12980A...Step 14.
- Flow Restrictor (2) Installed:
- If you continue to experience a leak from this area or any other hoses, please contact us by calling 1-800-BUY-MOEN (1-800-289-6636).
For additional information on Moen products visit solutions.moen.com and select the type of product you are repairing. The guide will contain repair details, troubleshooting and specific information on assembling handles associated with that style of product.
Still Not Finding What You're Looking For?
Contact Us or Call 1-800-BUY-MOEN
Non US? Moen Canada | Other International Sites