|
3360 transfer valve (commercial):
- Independent Functions: 3
- Shared Functions: 0
3362 transfer valve:
- Independent Functions: 3
- Shared Functions: 0
|
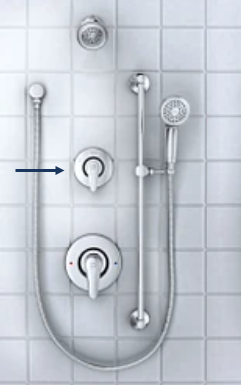
The 3360 transfer valve was introduced in 2011 and the 3362 transfer valve was introduced in 2018. They are both designed to divert water from one shower device to another (example: body sprays to a showerhead). Both the 3360 and 3362 Transfer valves require valves require either a PosiTemp or a Moentrol shower valve to provide water to supply to the system.
Moen Transfer valves use different handle mechanisms and the set screw to remove the handles are not in the same access point. Use the information below to identify the location of the set screw for your transfer valve.
|
Location of Set Screw:
|
|
Behind the Plug Button
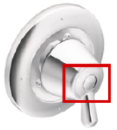
Used with valves: 3360
This style of handle has a small removable cap at the front of the handle concealing a Phillips screw.
|
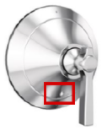
Under the Lever
Used with valves: 3360 and 3362
This style of handle has a small hole on the underside of the handle that contains a Hex screw.
|
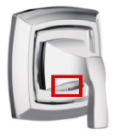
Under the Escutcheon Plate
Used with valves: 3362
This style of handle has a small hole on the underside of the decorative handle escutcheon that contains a Hex screw.
|
|
Preparation:
|
Location of Set Screw: Plug Button
|
|
Recommended Tools: Phillips Screwdriver, Pliers

If this is not your handle mechanism, see Vertical Spa: Transfer Valves article to learn more about the different handle mechanism types.
|
|
Disassembly:
1. Gently pry the cap (#1A) off of the end of the handle (#1C).
2. Using a Phillips screwdriver, unthread the handle screw (#1B) counter-clockwise and remove the handle (#1C).
To replace the cartridge (#1D), see article 163127 Cartridge: 3360 or 3362 Independent Transfer Valves.
|
|
Assembly:
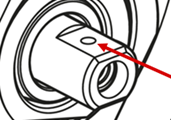
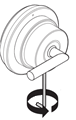
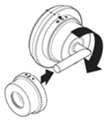
1. Using pliers, rotate the cartridge stem (#1D) so the flat side with the locating mark is facing upward.
|
|
| 2. Position the handle (#1C) with the lever facing down, slide the handle (#1C) onto the stem of the cartridge (#1D) and use a Phillips screwdriver to thread the handle screw (#1B) clockwise until tight. Push the cap (#1A) back into the handle (#1C). |
|
|
Recommended Tools: 7/64" Hex Wrench, Pliers
If this is not your handle mechanism, see Vertical Spa: Transfer Valves article to learn more about the different handle mechanism types.
|
Disassembly:
|
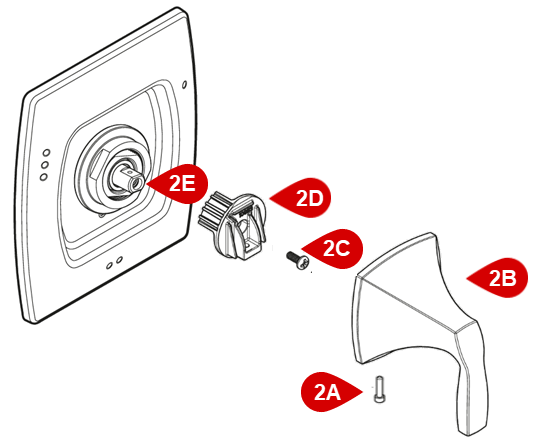
1. Remove the handle set screw (#2A) by inserting the 7/64" Hex wrench into the hole underneath the handle (#2B) to unscrew the set screw (#2A).
2. To remove the handle adapter (#2D), use a Phillips screwdriver to unthread the adapter screw (#2C) counter-clockwise.
To replace the cartridge (#2E), see article 163127 Cartridge: 3360 or 3362 Independent Transfer Valves.
|
Assembly:
|
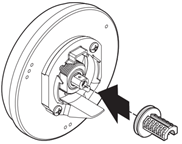
1. Using pliers, rotate the cartridge stem (#2E) so the flat side with the locating mark is facing upward.
|
|
|
2. Slide the handle adapter (#2D) onto the shower assembly. Using a Phillips screwdriver, thread and tighten the adapter screw (#2C) into the center of the handle adapter (#2D).
3. With the lever pointing down, slide the handle (#2B) onto the adapter (#2D) and use a 7/64" hex wrench to tighten the handle screw (#2A).
|
|
|
Set Screw: Escutcheon Plate
|
|
Recommended Tools: 3/32" Hex Wrench, Phillips Screwdriver, Pliers
If this is not your handle mechanism, see Vertical Spa: Transfer Valves article to learn more about the different handle mechanism types.
Disassembly:
| Note: For model TS32206 (Weymouth collection), remove the lever by unthreading it counter-clockwise. Continue to step 1. |
 |
|
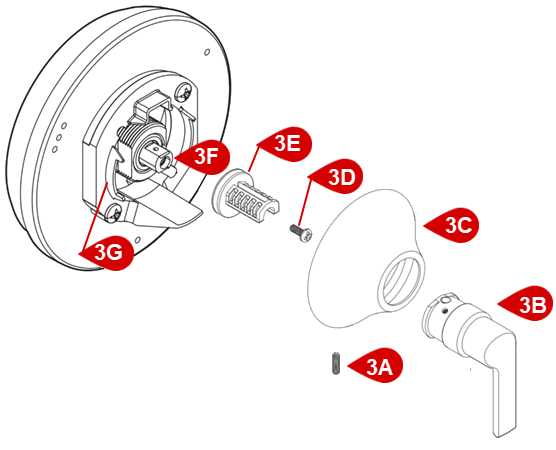
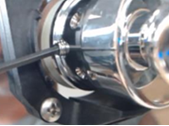
1. Remove the decorative handle escutcheon (#3C) by inserting the 3/32" Hex wrench into the hole underneath the decorative handle escutcheon (#3C). Loosen the handle set screw (#3A) enough to remove the decorative handle escutcheon (#3C).
|
 |
|
2. Slide the decorative handle escutcheon (#3C) over the handle (#3B).
|
 |
|
|
Assembly:
1. Using Pliers, rotate the cartridge stem (#3F) so the flat side with the locating mark is facing upward.
|
|
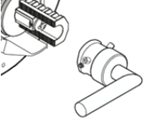
| 2. Position the handle adapter (#3E) with the open side facing down (see image) and slide the handle adapter (#3E) onto the stem of the cartridge (#3F). Using a Phillips screwdriver, tighten the adapter screw (#3D). Rotate the handle adapter (#3E) 90 degrees clockwise. |
 |
|
3. Position the handle (#3B) so the lever is facing the 9 o'clock position.
Note: The handle (#3B) may look different, but the installation is the same.
|
 |
|
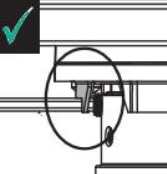
4. To ensure the handle (#3B) installs in the proper position, insert the 3/32" hex wrench into the handle set screw. While holding the hex wrench in place, slide the handle (#3B) on with the lever facing the 9 o'clock position until the hex wrench is flush against the mounting bracket tab (#3G). Tighten the handle set screw clockwise.
|
|
Note: The Hex wrench must be flush against the mounting bracket tab (#3G).
|
 |
 |
| 5. Position the decorative handle escutcheon (#3C) with the set screw (#3A) facing up and slide it over the handle (#3B). Rotate the decorative handle escutcheon (#3C) 180 degrees so the set screw (#3A) is facing down. |
 |
| Note: For model TS32206 (Weymouth collection), install the lever by threading it on to the handle clockwise. |
 |
|
For additional information on Moen products visit solutions.moen.com and select the type of faucet you are repairing. The faucet guide will contain repair details, troubleshooting and specific information on assembling handles associated with that style of product.
Still Not Finding What You're Looking For?
Contact Us or Call 1-800-BUY-MOEN
Non US? Moen Canada | Other International Sites