103686 Check Stop Replacement
Preparation:
|
 |
Preparing the Valve:
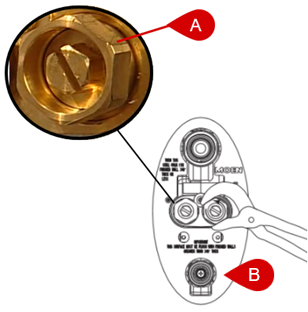
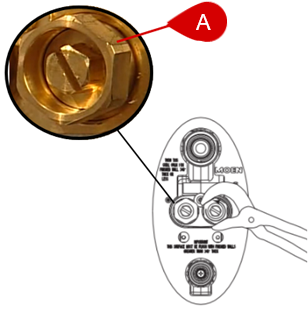
1. Prior to replacing the check stops, the water supply to the valve must be shut off. The valve's internal flow stops are opened and closed by turning the two large (1 1/8") outer hex nuts (A) located in the center of the valve. Turn off the flow to the valve by using a wrench to turn each of the large hex nuts (A) fully clockwise. To fully shut off the flow, several full turns of each hex nut (A) are required. After shutting off the water to the valve, release any residual water by turning the flow extension (B) fully counterclockwise. |
Accessing the Check Stops:
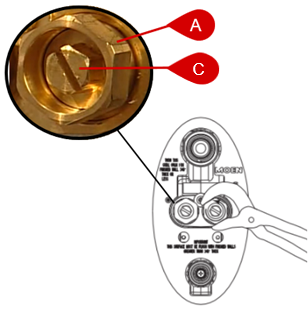
2. To remove the check stop assembly (C), position a wrench on the large outer hex nut (A) and hold it stationary. Use a flathead screwdriver in the slot in the center of the check stop assembly (C) and unthread counter-clockwise until it comes out. |
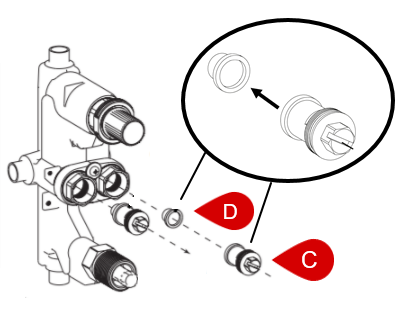
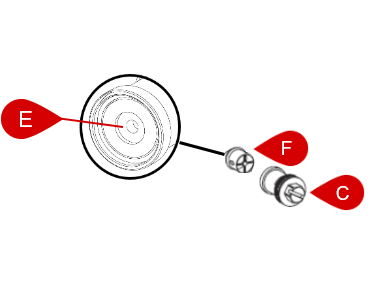
3. The replacement check stop assembly (C) includes a check stop (C) and a filter screen (D). The filter screen (D) is located on the back side of the check valve assembly (C). Remove the filter screen (D) by sliding it off the back of the check valve assembly (C). If the filter screen (D) did not come out with the check stop assembly (C), use tweezers or needle-nose pliers to pull it out of the opening that the check stop assembly (C) was removed from. |
|
4. The check valve (F) is installed inside of the brass check stop assembly (C). In the center of the back side of the check stop assembly (C) is the check stop disk (E). Remove the check valve (F) by using a small flathead screwdriver to depress the rubber check stop disk (E) and catch the screwdriver on the inside edge of the check valve (F). Slide the check valve (F) out of the brass check stop assembly (C). Slide the replacement check valve (F) with the arrow pointing into the brass check stop assembly (C). |
Flushing the Valve:
5. Flushing the valve eliminates any mineral build-up and loose debris that may have accumulated inside the valve body. To clear the system, water will need to be forced through the brass valve body. To flush the valve, turn the water on by using a wrench to slightly rotate the two large (1 1/8") outer hex nuts (A) counter-clockwise. Turn the water back off by using a wrench to rotate the two large (1 1/8") outer hex nuts (A) fully clockwise. |
Installing The Check Stop Assembly:
6. Attach the filter screen (D) to the check stop assembly (C) by sliding the large opening of the filter screen (D) onto the raised edge on the back of the check stop assembly (C). Reinstall the check stop assembly (C) by using a flathead screwdriver in the slot in the center of the check stop assembly (C) and thread it clockwise into the valve until tight. |

For additional information on 1/2" Exact Temp products visit Vertical Spa: 1/2" Exact Temp at solutions.moen.com.
Still Not Finding What You're Looking For?
Contact Us or Call 1-800-BUY-MOEN
Non US? Moen Canada | Other International Sites