Shower Faucet: Leaking-M-Core 4 Series Valve
In rare situations, the Moen M-core 4 Series system may experience a leak or drip. This article explains the different types of leaks and how to diagnose and repair the problem. To determine the best course of action we must assess how long it has been installed, and which type of leak your shower is having. An Existing Installation is best explained as a unit that has been installed for several weeks and functioned properly and is now leaking in the off position. A New Installation may exhibit the same symptom immediately following installation. The leak may produce water in the same fashion, but for different reasons.
| Type of Leak | Description | New Installation or Existing? | How to Resolve |
|---|---|---|---|
| Shut Off Leak |
When the shower is turned off the unit will drip or run water continuously 24/7. |
New |
1. Handle Calibration: This symptom occurs when the Handle (B) was not installed with the cartridge in the fully closed/off position. To correct this, it will require the Handle (B) to be taken off and reinstalled. Continue to Handle Calibration 2. Replace 1214 Cartridge: If that does not resolve the issue Replace the 1214 Thermostatic Cartridge For warranty assistance Contact Us or Call 1-800-BUY-MOEN. For cartridge installation instructions see article 1214 M-Core Cartridge. |
| Shut Off Leak | Existing | 1. New symptom/existing shower: With Existing Installation, the unit was functioning properly and suddenly began leaking this is an indication that the 1214 cartridge needs to be replaced. For warranty assistance Contact Us or Call 1-800-BUY-MOEN. For cartridge installation instructions see article 1214 M-Core Cartridge. | |
| Concealed Leak |
This type of leak may take longer to identify. In this situation, the water is leaking behind the wall or is seeping out from around the handle or escutcheon. |
New |
1. Cartridge Retaining Nut: If you are sure that the water is seeping from around the handle follow the steps to ensure that the Cartridge Retaining Nut is properly tightened.
|
| Concealed Leak | New or Existing | 1. Valve Installation issue. Follow the steps below to determine if the valve connections behind your wall are leaking. |

Preparation:
- The water supply shut off valves must be turned off-see article How To Turn Off The Water Supply To The Faucet.
- Recommended Tools: 3/32" Hex Wrench, Adjustable Wrench
- We recommend covering the drain before beginning so as not to lose any parts down the drain.
M-Core 4 Series Valve and Trim: |
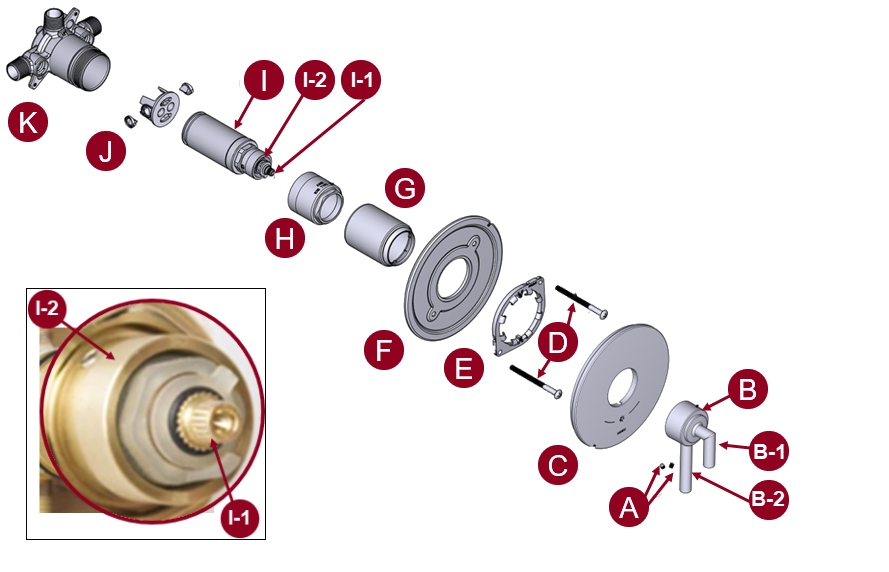 |
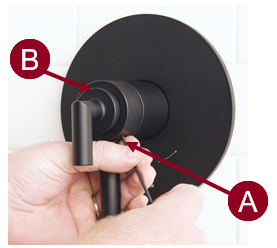
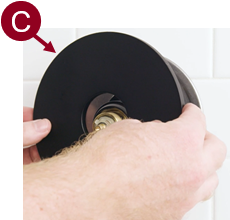
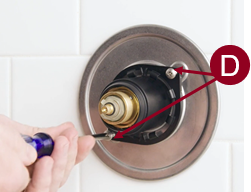
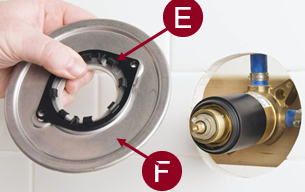
A- Set Screws B- Handle
C- Escutcheon (back plate) D- Backing Plate Screws E-Snap Ring F- Backing Plate G- Decorative Sleeve (Matches the finish of the faucet) H- Cartridge Nut (Brass) I- Cartridge
J- Adapter with Check Valves K- Valve Body |

Shut off leak: Handle Calibration: |
|
 |
2. With an Adjustable Wrench-
|
 |
|
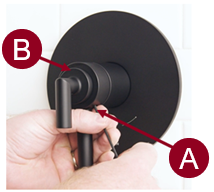
4. Positioning both levers facing downward, place the Handle (B) on the Cartridge Stem (I-1), and push it on the assembly as far as it will go. |
5. With the 3/32" Hex wrench tighten the two Set Screws (A) on the underside of the Handle (B) until it is secure. |
6. Test for Leaking: Turn the main water supply back on. Then turn the shower handle assembly on and then off, and monitor it for leaks. |
If the leak continues replace 1214 Thermostatic Cartridge-For warranty assistance Contact Us or Call 1-800-BUY-MOEN. For cartridge installation instructions see article 1214 M-Core Cartridge. |
If the leak has stopped-The issue has been resolved, proceed to Last Step Final Adjustment: Water Temperature is Too Hot or Too Cold |

Concealed Leak: Cartridge Retaining Nut: |
Preparation:
|
|
1. Remove Handle: Using a 3/32" Hex wrench, loosen the two Set Screws (A) on the underside of the Handle (B) until you can remove the Handle |
 |
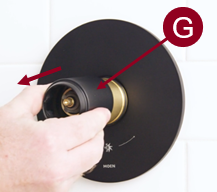
2. Remove Trim: Slide the Decorative Sleeve (G) off of the shower assembly. |
 |
|
3. Tighten Cartridge Nut: Ensure the Cartridge Nut (H) is hand-tight, then tighten it an additional quarter turn with an Adjustable Wrench. Note: The Cartridge Nut (H) secures the Thermostatic Flow Cartridge inside the valve body. This nut must be secure before the main water supply can be turned back on |
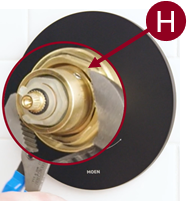 |
4. Test for Shower System Turn the water supplies back on. Observe the system for a period of time to determine if you can see any water escaping around the Cartridge Nut (H) or seeping out from behind the Round Escutcheon (C) back plate
|
|

5. No Leak Observed?The issue has been resolved
|
Leak ContinuesRepeat the process if the water is visible around the Cartridge Nut (H)
|
|
6. Slide the Decorative Sleeve (G) onto the shower assembly as far back as possible. It must be flush or recessed slightly inside of the Escutcheon (C). |
|
7. Positioning both levers downward, place the Handle (B) onto the Cartridge Stem (I-1), pushing it onto the assembly as far as it will go. With the 3/32" Hex wrench tighten the two Set Screws (A) on the underside of the Handle (B) until secure on the shower assembly. |
 |

| 8. Proceed to Last Step Final Adjustment: Water Temperature is Too Hot or Too Cold |

Concealed Leak: Valve Installation issue: |
Preparation:
|
|
1.Using a 3/32" Hex wrench, loosen the two Set Screws (A) on the underside of the Handle (B) until you can remove the Handle. |
 |
2. Gently use a Flathead Screwdriver between the wall and the Escutcheon (C) to release it off of the wall. |
 |
|
3. Using a Phillips Screwdriver, unthread the Escutcheon Screws (D). |
 |
4. Remove the Snap Ring (E) and Backing Plate (F) from the wall. |
 |
|
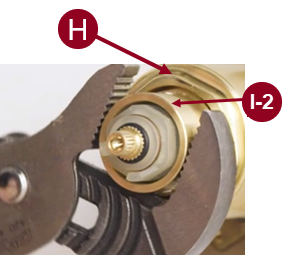
5. With the Adjustable Wrench rotate the Cartridge Ring (I-2) clockwise until it stops. Caution: Do not loosen the Hexagonal Cartridge Nut (H). This nut must be secure before the main water supply can be turned back on.
|
 |
6. Test for Leaking: Turn the water supply back on and observe the system for leaks.
Proceed to Last Step Final Adjustment: Water Temperature is Too Hot or Too Cold. |
Last Step Final Adjustment: Water Temperature is Too Hot or Too Cold |
The M-Core 4 Series is designed with a basic maximum temperature of 100 degrees. At the time of installation or after a repair you may notice that the shower temperature is too hot or too cold in the full hot handle position. At any time, this can easily be reset by following a few simple steps. For additional information on adjusting the temperature, see article How to Adjust the M-Core 4 Series Temperature Limit Stop.
For additional information on M-Core Shower products, visit Two Handle Shower: M-Core 4 Series Valve at Solutions.moen.com.
Still Not Finding What You're Looking For?
Contact Us or Call 1-800-BUY-MOEN
Non US? Moen Canada | Other International Sites