1214 M-Core Cartridge 4 Series
Preparation:
To View Complete Installation Video Visit: M-CORE 1214 Cartridge Replacement. |
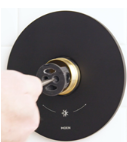
Handle Removal: |
Handle Operation Overview: The M-Core 4 Series features an innovative two handle stacked design, an inner/longer handle that rotates to control the on, off, and flow volume functions. And a front/shorter handle which rotates for temperature control. A unique feature of this handle assembly is the unique synchronized motion during operation. The Temperature Handle is designed to rotate along with the Volume/flow Handle during flow, on, and off adjustments. This simultaneous movement is intentional, and does not affect the previous established temperature setting. Adjusting the volume or shutting the shower off should not modify the position that the temperature handle was last set.
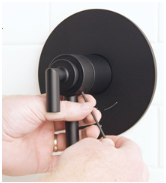 |
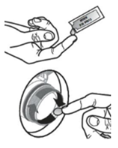
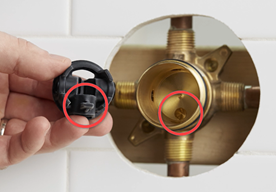
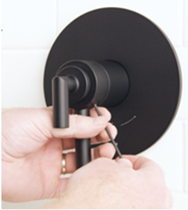
1. Using a 3/32" Hex wrench, loosen the two Set screws on the underside of the handle until you can remove the Flow/Temperature handle.
|
|
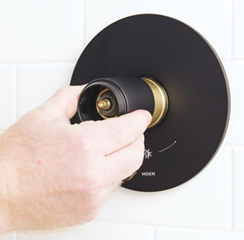
2. Slide the Sleeve off of the Escutcheon Plate and Valve Assembly. |
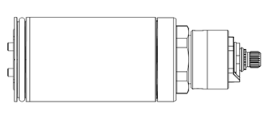
Cartridge Parts Legend: |
|
4 Valve Body |
3 Adapter with Check Valves |
2 Cartridge |
1 Cartridge Nut |
.png?revision=1)

| 3 Adapter with Check Valves: The Check Valves are pressed into the sides of the Adapter at the distribution center however occasionally during transit they can become loose. This is a simple fix, they can be pressed firmly into the appropriate hole on the Adapter. |
Cartridge Removal and Valve Body Preparation: |
|
|
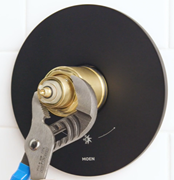
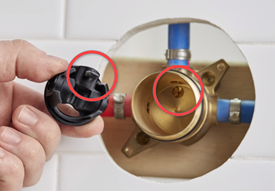
Using an adjustable wrench, unthread the Cartridge Nut (1) counter-clockwise to remove. |
|
Slide the cartridge out of the brass Valve Body (4). |
 |
Using Needle-Nose pliers, remove the Adapter with Check Valves (3) Note: If you notice residue inside the Valve Body (4) see article, Valve Body Cleaning and Flushing. |
 |
Using the lubricant supplied with your 1214 Cartridge (packet number 99915), grease the Outer O-Ring and inside of the Valve Body (4).
|
Installing the Cartridge: |
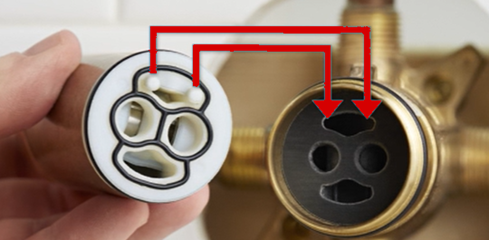
The next piece you are installing is the Adapter with Check Valves (3). First, confirm both Check Valves are securely in place on either side of the Adapter (3). Locate the hole in the back wall of the Valve Body (4). Line up the Adapter tab with the hole in the Valve Body (4) and slide the Adapter (3) in as far as it will go. Note based on your installation the opening for the Adapter tab may be at the top or bottom of your valve body |
Align the 2 posts on the Cartridge (2) to the opening at the top of the Adapter with Check Valves (3) and push the Cartridge (2) into Valve Body (4) until it stops. Tighten the Cartridge Nut (1) onto the Valve Body (4) by turning clockwise until hand tight, and then an additional 1/4 turn with a wrench. |
Handle Reassembly: |
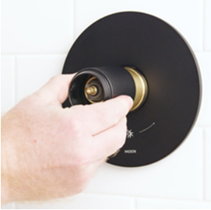 |
Slide the Sleeve onto the assembly until it is flush with the Escutcheon Plate and Valve Assembly. |
 |
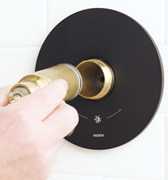
With both levers pointing down, place the Flow/Temperature handle onto the stem of the Cartridge (2). Push the handle as far back as it can go and use a 3/32" Hex wrench to tighten the two Set screws on the underside of the handle. |
For additional information on M-Core Shower products, visit Two Handle Shower: M-Core 4 Series Valve at Solutions.moen.com.
Still Not Finding What You're Looking For?
Contact Us or Call 1-800-BUT-MOEN
Non US? Moen Canada | Other International Sites