Moen produces a variety of single handle 4" spread centerset lavatory sink faucets. The interior components and assembly are not the same for each model. This article will explain one of the most common handle assemblies referred to as an Adapter. This mechanism was introduced in 1996 and was used on a select group of product through 2009. This article explains the version between 2007-2009. This faucet style utilizes a 1225 cartridge.
Preparation:
|
Version 1:

|
Figure A
|
|
Disassembly:
- Pull the plug button (#1) out of the handle (#3) and use a 7/64" Hex wrench, remove the Hex screw (#2).
- Lift the handle (#3) off of the faucet and unthread the Phillips screw (#4).
- Lift off the connector/adapter (#5).
- Remove the dome (#6).
For replacing the cartridge see article 1225 Cartridge: Single Handle Bathroom Faucets (Prior to 2009).
|
Assembly:
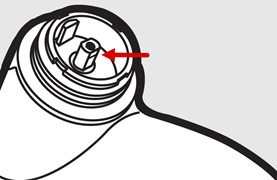
Make sure the notch on the flat side of the top of the cartridge stem is facing forward. See Figure A.
- Place the dome (#3) onto the faucet.
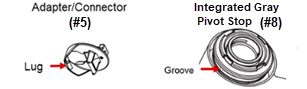
- Hook the lug on the adapter/connector (#2) into the groove on the integrated gray pivot stop (#5). While attaching the connector (#2), notice the profile on the bottom of the black plastic connector (#2) aligns with the top of the cartridge stem.
- Thread and tighten the Phillips screw (#4) and set the handle (#3) on top of the faucet.
- Use a 7/64" Hex wrench to install the Hex screw (#2) and push the plug button (#1) back in.
|
|
Version 2:
|
Figure A
|
|
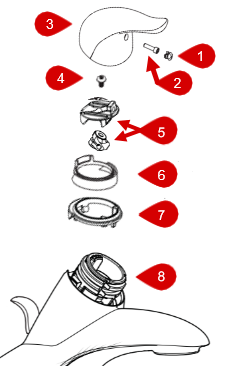
Disassembly:
- Pull the plug button (#1) out of the handle (#3) and use a 7/64" Hex wrench, remove the Hex screw (#2).
- Lift the handle (#3) off of the faucet and unthread the Phillips screw (#4).
- Lift off the connector/adapter (#5).
- Remove the finished ring shield (#6).
- Lift off the collar (#7).
For replacing the cartridge see, 1225 Cartridge: Single Handle Bathroom Faucets (Prior to 2009).
|
Assembly:
Make sure the notch on the flat side of the top of the cartridge stem is facing forward.
- Slide the collar (#7) onto the faucet.
- Install the finished ring shield (#6) with the tab pointing upward.
- Hook the lug on the adapter/connector (#5) into the groove on the integrated gray pivot stop (#8). While attaching the connector (#5), notice the profile on the bottom of the black plastic connector (#5) aligns with the top of the cartridge stem.
- Thread and tighten the Phillips screw (#4) and set the handle (#3) on top of the faucet.
- Use a 7/64" Hex wrench to install the Hex screw (#2) and push the plug button (#1) back in.
|
For additional information on Moen products visit solutions.moen.com and select the type of product you are repairing. The guide will contain repair details, troubleshooting and specific information on assembling handles associated with that style of product.
Still Not Finding What You're Looking For?
Contact Us or Call 1-800-BUY-MOEN
Non US? Moen Canada | Other International Sites