Single Handle 4" Centerset Lever: Adapter (Prior to 2002)
Preparation:
- The water supply shut off valves must be turned off- see article How to Turn Off the Water Supply to the Faucet.
- Recommended Tools: Phillips Screwdriver, 7/64"Hex Wrench
|
|
Disassembly:
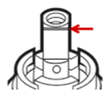
If you need to replace the cartridge or the pivot stop (#10), confirm the water is off and use a flathead screwdriver to pull out the retainer clip (#9) from the back of the pivot stop (#10). Pull the pivot stop (#10) and washer (#11) off the faucet. For replacing the cartridge see article 1225 Cartridge: Single Handle Bathroom Faucets (Prior to 2009). |
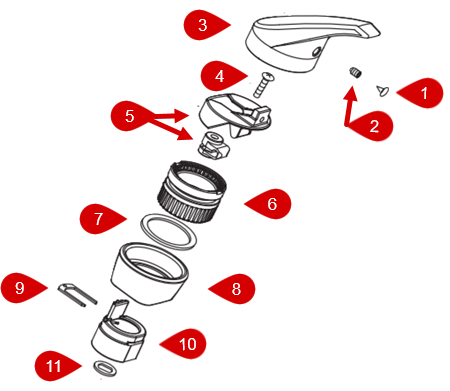
Assembly:Make sure the notch on the flat side of the top of the cartridge stem is facing forward. See Figure A. If the cartridge or pivot stop (#10) were replaced you must first place the washer (#11) on the cartridge stem. Next, slide the pivot stop (#10) on with the tooth at the back of the faucet. Slide the retainer clip (#9) into the slot on the pivot stop (#10). If you encounter any resistance, the cartridge may not be properly aligned, see Installing a Cartridge Clip (1200 and 1225 Cartridge) for additional details.
|
For additional information on Moen products visit solutions.moen.com and select the type of product you are repairing. The guide will contain repair details, troubleshooting and specific information on assembling handles associated with that style of product.
Still Not Finding What You're Looking For?
Contact Us or Call 1-800-BUY-MOEN
Non US? Moen Canada | Other International Sites